Mother’s Day in the UK

I don’t know the reason why, but the date of Mother’s Day here in the UK does not follow the rest of the world. This year Mother’s Day was yesterday – 14 March 2021.

My lovely mummy is now 87 years old and delights in the cards I make her (and for everyone else too)! I always seem to be strapped for time so thought I’d cheat a little and buy a digital .svg file from Dreaming Tree as I thought it would be a quicker way of making the card… how wrong was I! Even so, I really enjoyed making this card.

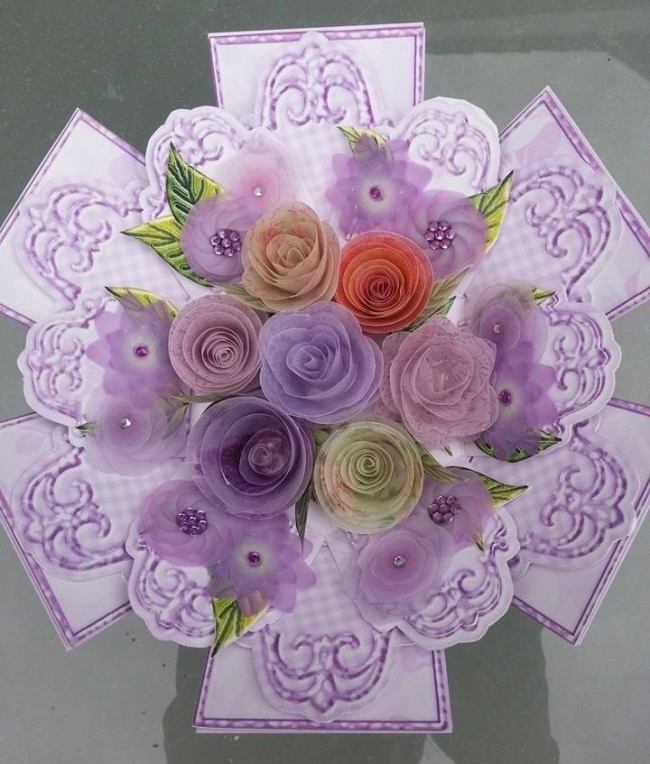
It is an accordion card but a little bit different from traditionally folded accordion cards. This one actually lifts from it’s base to reveal the greeting.

Materials:

  • DCWV Wildflower printed 12″ x 12″ double-sided cardstock pad. I chose the multi coloured roses with a green reverse. I tried to match the colours of the pearlescent card to the colours of the roses as closely as possible from my stash.
  • Peach pearlescent card for the flowers
  • Cerise pearlescent card for large flower on top of card, for the greeting toppers and a layer of the base
  • Purple textured pearlescent card for the base and flower centres
  • Peach satin ribbon for the finger loop at the top of the card and for the box envelope
  • Yellow card a square for the greeting under the base and for the box envelope (American Crafts Smooth Cardstock Pad “The Color of Memories”)
  • Chalk “cats-eye” inks in Warm Violet, Dark Peony and Aquamarine
  • Sakura GellyRoll pen #724 Purple
  • Double-sided self adhesive tape or tacky glue.

Here are all the elements prior to assembly:

I inked the edges of all the peach flower lightly with Warm Violet chalk ink; the edges of the cerise elements with Dark Peony, and the green elements with Aquamarine then began assembling. There is a comprehensive video tutorial on the Dreaming Tree website to help you along. You can watch it on the website or via YouTube.

If I were to do anything differently, I would not use tacky glue or wet glue of any kind as when mine dried it warped the card even though I used the glue very sparingly.

As you may be aware, I use both Photoshop Elements 13 and MS Publisher when creating any wordart. I created “Happy Mother’s Day” in Photoshop Elements in a dark purple colour, then opened the “caption tags” .png file on another tab. I then deleted the “Happy Birthday” greeting, sized and placed 4 x “Happy Mother’s Day” wordarts so they were positioned correctly on the tags. Once I had gotten the position right, I deleted the tags .png, which left just 4 “Happy Mother’s Day”s with no background. I then saved this as a .png file. I was then able to open this .png in MS Publisher and printed this on cerise pearlescent card safe in the knowledge they were in the correct position to be cut out accurately on my Brother Scan’n’Cut SDX1200.

Here is the card in it’s “resting” position. It actually compresses down further to fit in the box envelope which is also included in the cut files.

As always, please do not hesitate to contact me if you would like any clarification of my information above.

Pretty Birthday Card

It was my friend’s birthday last week. She was in Italy when the lockdown for COVID-19 took hold, so has been there ever since (what a lovely place to be restricted to – right beside a lake too!)

Here’s the card I made for her:

I started by cutting my A4 white 300gsm cardstock to 29.7cm x 15cm. I then cut out a circle in the centre using my trusty Scan n Cut.

I found the beautiful floral wreath design on one of my stash of digital project life cards, so extracted it using Photoshop Elements, now creating a digital floral wreath jpeg file. I then exported it into Scan n Cut Canvas to create the necessary .fcm file to enable the design to be cut using my machine.

I then created a digital “happy birthday” wordart using “I Love Christmas” font, printed it off and made the banner.

The insert was made from 120gsm white paper. I started by printing my friend’s name “Gena” in the middle right hand side matching the colour to one in the floral wreath, then printed the Italian for “Happy Birthday with love from” on the reverse, making sure it was printed on the right hand side again. I then folded the paper in half and cut it to size, to fit inside the main card.

Please excuse the messy cover-up of personal greeting 😉 !

I then adhered the floral wreath to the front of the card with self-adhesive foam squares to add some dimension, ensuring the wreath fit over the circle I had previously cut out perfectly.

I’m really happy with how the card turned out!

18th Birthday card for a girl who isn’t girlie!

Have just made this birthday card for a friend’s daughter, who happens to be like my daughters in the fact that they just don’t like pink!  The funny thing is, they’re all “scientists”!  My eldest daughter, in particular, went through a stage of she would wear anything so long as it was black!  She got past 18 and then began to appreciate pretty things.  Anyway, here’s the card:

Image

Image

I just had to add the purple gems to add some sparkle!

Products used:

  • Pink Petticoat’s “Pretty Doodles” pattern (unfortunately no longer available – so glad I managed to get this – it’s so pretty)
  • Anita’s gems (Gem Wheels)
  • Textured pearlescent purple card
  • White 300gsm glossy card
  • Tiny flower brads (purple)
  • Sakura Ball Sign Tiara Glitter pen – purple
  • Font:  Janda Quirky Girl (18 today!)
  • Printed on my Epson R1900 printer

If there’s anything you’d like to ask me about creating a card digitally, please contact me.

It’s Mother’s Day!

It’s surprising how quickly Mother’s Day’s arrived again this year – mind you, where does the time go?  We usually celebrate Mother’s Day on the last Sunday in March here in the UK.  Here are some photographs of a different kind of card I made for my Mummy this year – a box of flowers!

ImageImageImage

ImageImage

ImageImageImage

The final photograph above was taken outside… it’s amazing how different the colours look!

To achieve the above, I actually cheated a little.  I bought a digital kit from Crafts U Print  and printed it out onto 300gsm glossy card.  I decided the flowers that came with this didn’t really look fragile enough when cut out from this weight card, so decided to use vellum.  I then went through my digital stash of papers and chose various complimentary coloured papers – some floral, some blended papers and printed these onto A4 vellum.  I then had a look through my Pazzles Inspiration cutting files and found some “spiral” flowers i.e., a spiral is cut into a circle and after cutting it out, you roll it and this makes the rose-looking flowers.  I then cut out lots of these, rolled them, glued them with a hot glue gun and then chose the ones I wanted to use.  If you’d like to have a go at making these types of flowers but don’t have an electronic die cutting machine, take a look at this tutorial http://snapcreativity.com/easy-diy-paper-flowers/

The “flat”-looking  flowers aren’t acutally flat, they’re layered vellum.  I also added little gems to make it sparkle.

It is a lovely alternative to the “normal” type of card, although very labour intensive.  Just shows the amount of love I put into it for my very special Mummy!  🙂